Users
- 13 Apr 2023
- 5 Minutes to read
- Print
- DarkLight
- PDF
Users
- Updated on 13 Apr 2023
- 5 Minutes to read
- Print
- DarkLight
- PDF
Article summary
Did you find this summary helpful?
Thank you for your feedback!
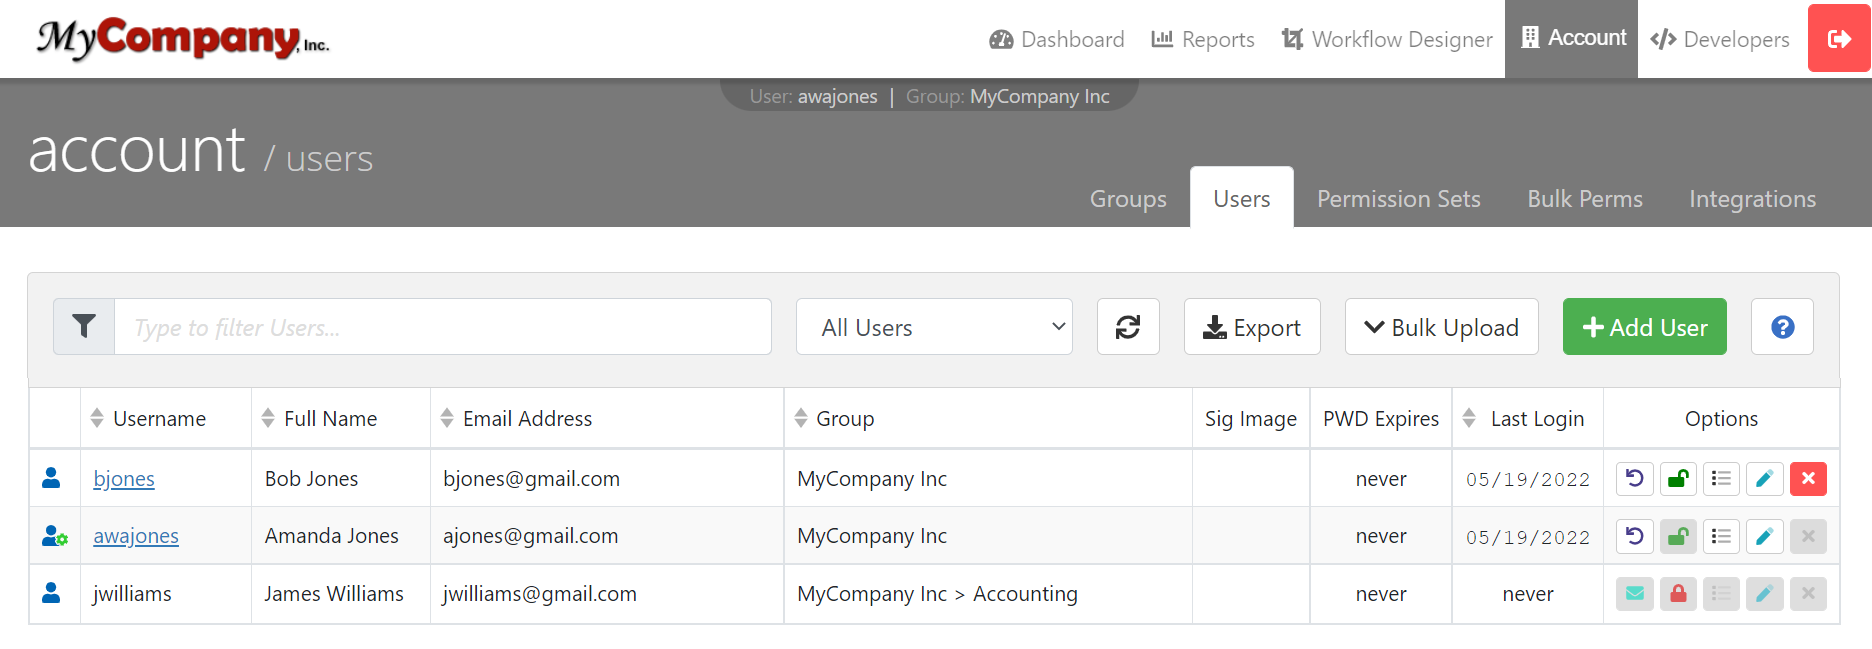
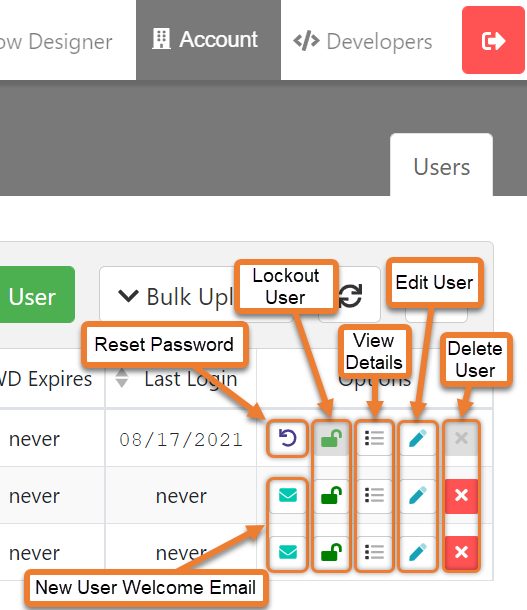
On the User dashboard, you will see details of users such as Username, Full Name, Email Address, Federated Username, Default Group, Sig Image, Password Expiration setting, and Last Login date. You will have the ability to reset, add new users, and designate their permissions. Use the filter and search at the top of the screen to narrow down the list when looking for a specific user. You will also have options to send a New User Welcome Email, send an email to the user to update their password, lockout the user, view details, and edit the user or delete the user.
IMPORTANT NOTE: In order to edit a user you must switch to their Home/Default Group. An example is the user James Williams, which can be seen in the image below. In order to edit his account, I will need to switch to the Sub-Group Human Resources.
Add New Users
- Click on the Account menu in the top right corner of the screen.
- Select Users. This brings you to the Users dashboard.
- Click the Add User button.
- Please note that the group you are in will become the Home/Default Group for the new user. You can change this after the user has been created.
- Enter basic information including username, first name, last name, and email address.
- Enter the user Title, Organization, and Federated Username (if applicable).
- Select the Permission Set and signing options.
- Select the Notification option, whether to send the New User Welcome Email.
- Please note that you will be able to send the New User Welcome Email at a later time.
- Add any SSO Logins for the user.
- Please note that you will be able to add SSO Logins for the user at a later time.
- Once all the necessary information is entered, click Add User. The new user will be added to the list of users on the dashboard.
- If the Send New User Welcome Email option is selected, this will trigger an email to the new user to login for the first time and update their password.
Edit Users
- Switch to the Users Home/Default Group
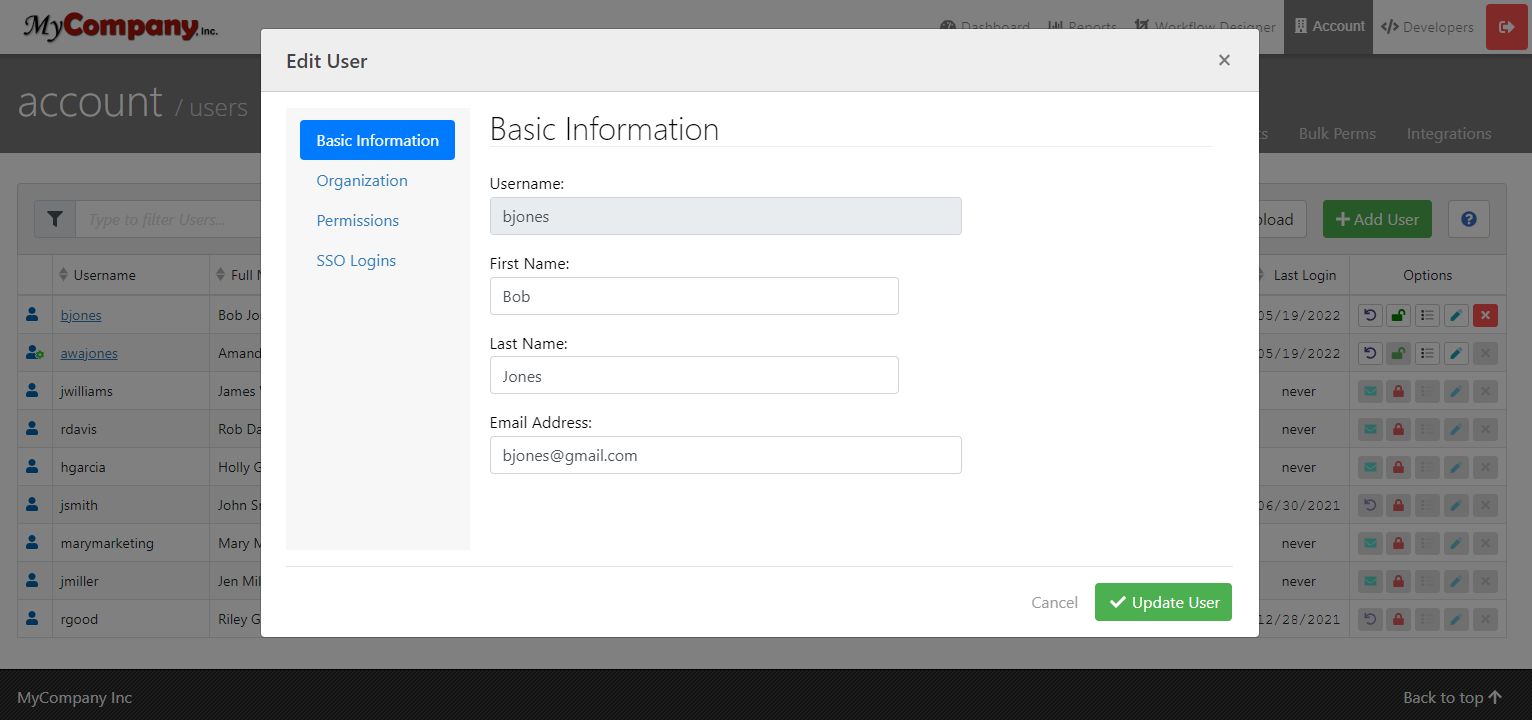
- Click on the Edit User button next to the User you want to edit
- The Edit User pop-up will then appear. You will then be able to edit the following information for the User:
- Basic Information, which includes: First name, Last Name, Email Address
- Organization, which includes: Users Home/Default Group, Title, Organization, Required Password Change Schedule
- Permissions, which is where you can add or remove permission to Groups and Sub Groups
- SSO Logins, which is where you can add any SSO login information for the user. (Note: you need to add an SSO integration to your account in order to utilize SSO Logins)
View User Details
- Switch to the Users Home/Default Group
- Click on the Users Username
- The User Details will then appear on the screen. This page will include all information on the User.
- The permissions tab will show all permissions the User has and can be edited.
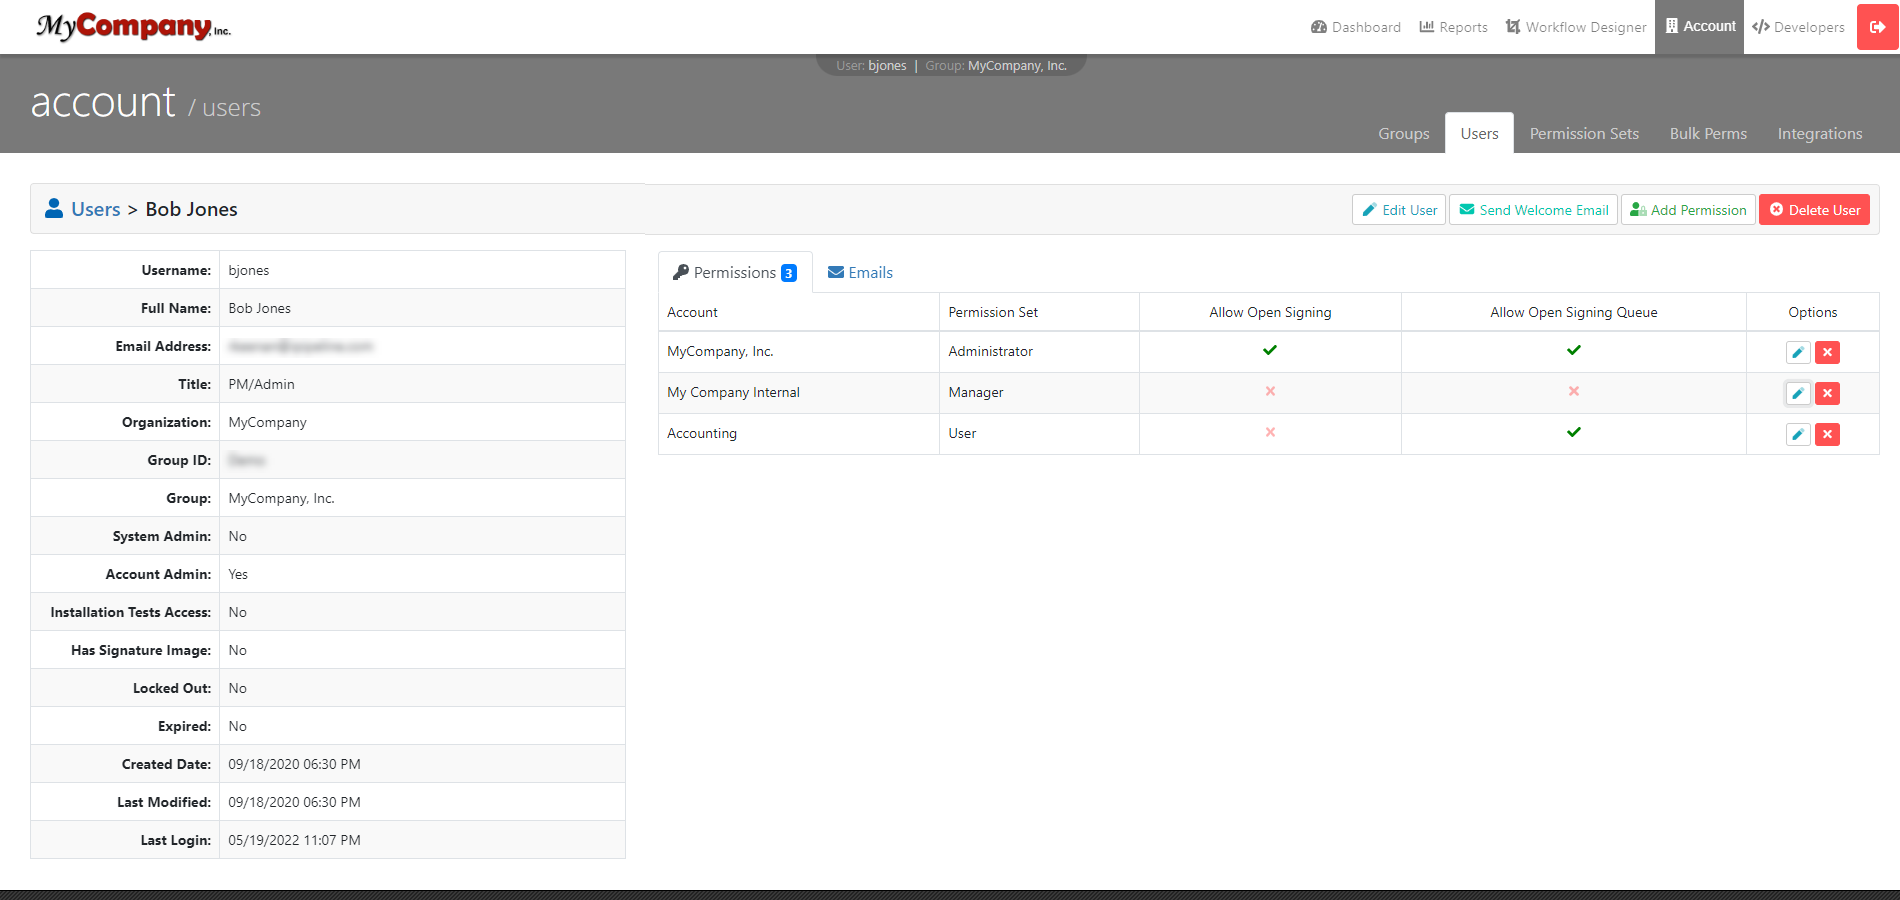
b. The Emails tab will show all emails that have been sent to the User from the system. This includes all transactions and system emails.
Note: Emails only appear in this section for SaaS subscribers and on-premise licensees who use a supported email service integration. 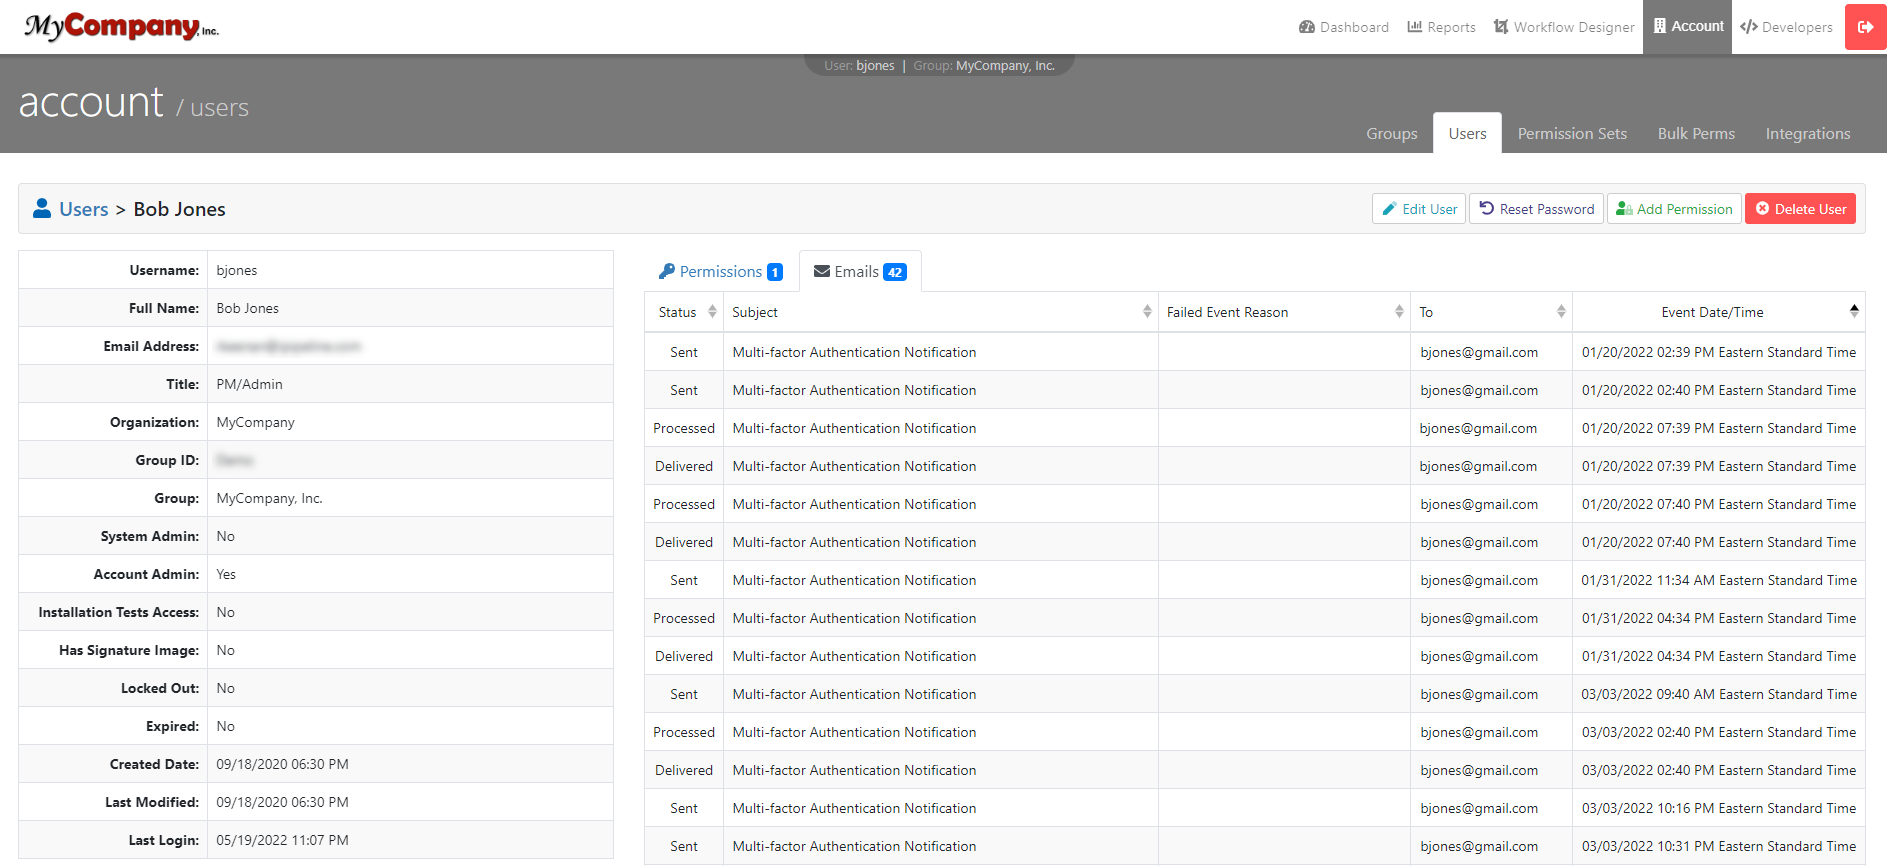
Email Statuses
| Status | Description |
|---|---|
| Sent | The email was created and put in queue to be sent. (Email placed in the sent queue) |
| Processed | The email was processed by the email services and successfully sent. (Email processed and sent) |
| Delivered | The email services received an accepted response generated by the recipients' mail server. (Email delivered to the recipient) |
| Open | The email services received a response generated by a recipient opening an email. (Email opened by the recipient) |
| Deferred | The recipient mail server asked the email services to stop sending emails so fast. (Soft Bounce) The email services will continue to try for 72 hours to deliver a deferred message. After 72 hours, the deferral turns into a block. |
| Drops | The email services will drop an email when the contact on that email is in one of your suppression groups, the recipient email previously bounced, or that recipient has marked your email as spam. |
| Bounces | The receiving server could not or would not accept the message. The email is bounced. Bounces often are caused by outdated or incorrectly entered email addresses. |
| Blocks | When your IP address has been blocked by an ISP or messaging organization. |
| Spam Reports | Whenever a recipient marks your email as spam and their mail server tells us about it. |
Bulk User Uploads
To upload multiple users, click on the "Bulk Upload" button in the filter bar. You can select one of two options: Insert Users or Delete Users.
Inserting Users File Format:
Required fields are indicated with a "*". Additional fields are required if Create Sub-Group = 1/true. Those fields are indicated with a "*" in the Description.
Fields that can be updated utilizing the Update Existing Users option are indicated with a "*" in the Description.
| Column Name | Data Type | Description |
|---|---|---|
| A. ProntoID* | String (AlphaNumeric only, max 32 chars) | Reference ID for the Group |
| B. Create Sub Group* | Boolean (1 = true or 0 = false) | Create a new sub-group to add the User into. Important Note: If this value is 1/true, the additional fields are required: Sub Group Name, Sub Group Owner Name, Sub-Group Owner Email Address, Document Retention in Days. |
| C. Sub Group Name | String (max 32 chars) | Required if Create Sub Group is 1/true* |
| D. Sub Group Owner Name | String (max 64 chars) | Default "From Name" for outgoing emails Required if Create Sub-Group is 1/true* |
| E. Sub Group Owner Email Address | String (max 128 chars) | Default "Reply/Response Email Address" for outgoing emails Required if Create Sub-Group is 1/true* |
| F. Document Retention In Days | Integer (0 - 2147483647) | Use 0 for never delete Required if Create Sub-Group is 1/true* |
| G. Username* | String (max 63 chars) | |
| H. Password* | String (max 64 chars) | Update Existing Users Applicable* |
| I. Federation Integrations | FederationIntegrationName|Username String (max 64 chars) | String (max 150 chars) | Note: Multiple integrations can be added to a User Example: Okta|bjones@mail.com;ADFS|bjones@mail.com Update Existing Users Applicable* |
| J. First Name* | String (max 16 chars) | Update Existing Users Applicable* |
| K. Middle Name/Initial | String (max 16 chars) | Update Existing Users Applicable* |
| L. Last Name* | String (max 40 chars) | Update Existing Users Applicable* |
| M. Suffix | String (max 4 chars) | Update Existing Users Applicable* |
| N. Email Address* | String (max 128 chars) | Update Existing Users Applicable* |
| O. Title | String (max 64 chars) | Update Existing Users Applicable* |
| P. Organization | String (max 64 chars) | Update Existing Users Applicable* |
| Q. Security Question | String (max 256 chars) | Update Existing Users Applicable* |
| R. Security Answer | String (max 256 chars) | Update Existing Users Applicable* |
| S. Force Password Change* | Boolean (1 = true or 0 = false) | Update Existing Users Applicable* |
| T. Send New User Welcome Email* | Boolean (1 = true or 0 = false) | Update Existing Users Applicable* |
| U. Permission Set ID* | Integer (0 - 2147483647) | |
| V. Allow Signing* | Boolean (1 = true or 0 = false) | |
| W. Allow Open Signing* | Boolean (1 = true or 0 = false) | |
| X. Allow Pending Signature Queue* | Boolean (1 = true or 0 = false) |
Watch the tutorial below on how to create Users.
To open the video in a new tab click on this link: Create Users
Watch the tutorial below on how to manage and edit Users.
To open the video in a new tab click on this link: Manage and Edit Users
Was this article helpful?