Bulk SSO
- 25 Apr 2023
- 1 Minute to read
- Print
- DarkLight
- PDF
Bulk SSO
- Updated on 25 Apr 2023
- 1 Minute to read
- Print
- DarkLight
- PDF
Article summary
Did you find this summary helpful?
Thank you for your feedback!
The Bulk SSO section allows you to add or replace all existing SSO Logins to one or more users. Select the user(s) you wish to apply an SSO Login, next, select the integration, then enter the Username Format.
To add bulk SSO Logins
- Click Account in the top right corner of the screen
- Select Users
- Click on the Bulk Editors button
- Next, click on the SSO Logins tab
- Select the user(s) you wish to apply an SSO Login from the list box on the left.
- To find specific users, filter the list using the name of the user or filter by Group using the Group selection (if available).
- Click the green Add button in the middle of the screen to add user(s) to the box on the right.
- Next, select the SSO Integration set from the Integration drop-down to use with the user(s) selected.
- Enter the format that should be used for each user using one or more of the following placeholders. This will create a unique username for all selected users based on their individual profile information.
- Available Placeholders:
{{EmailAddress}}{{EmailAddressUsername}}{{FirstName}}{{LastName}}{{FirstInitial}}{{LastInitial}}
- Examples:
{{EmailAddress}}= jwsmith1@mycompany.com{{EmailAddressUsername}}= jwsmith1- mycompany\
{{FirstInitial}}{{LastName}}= mycompany\jsmith - mycompany\
{{FirstName}}.{{LastName}}= mycompany\john.smith
- Available Placeholders:
- If applicable, check the checkbox to replace all existing SSO integrations.
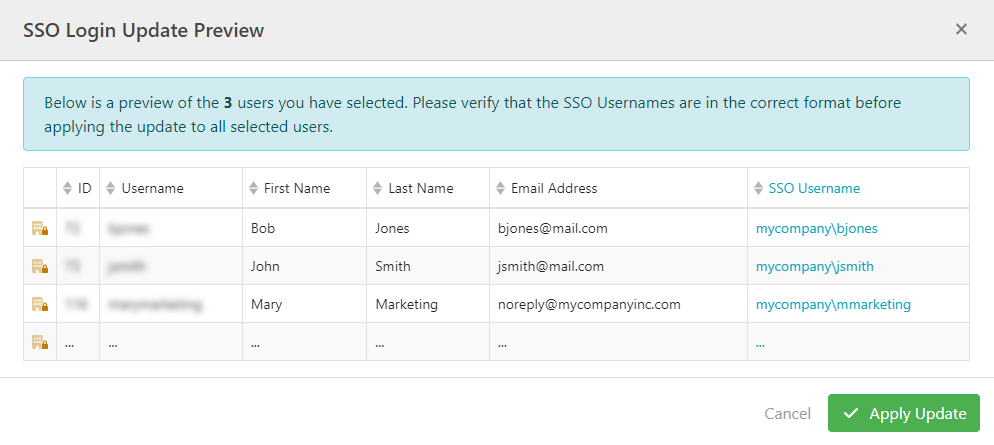
- Next, click on the Preview Changes button to see the SSO Usernames for the selected user(s).

11. If the previewed SSO logins are correct, click Apply Update button to add the SSO Login(s).
Was this article helpful?

